Pages

Thursday, January 31, 2013

My Dream Kitchen Part 2: Planked Walls

I love love LOVE how our Dining room planked walls turned out!!!!!! And I am so excited to finally put some pictures up! :)


This is a fairly easy 1 day project that cost us about $60 for the wood; this includes the trim pieces we used on the corners as well as the paint-able plywood we used for the planks. You will need an air compressor and nail gun to make this easy and fast! Shelley from House of Smiths has an amazing tutorial you can read about HERE. We followed the same steps as they did so I will just refer you over there for the complete tutorial! :)


We have received so many compliments on this wall! I love how it added so much design to our dining space! We left it the same white as the rest of the walls, it makes the space feels larger, and brings attention without being overbearing. ....Plus I just love how white walls can make a home feel so bright and clean.  :) 


Once again, we couldn't be happier with how it turned out! ...and I got some fun new curtains out of it too!  ;) 


Monday, January 28, 2013

DIY Sunburst Mirror

This is a super fun and easy project that only took me about 30 minutes to assemble. 


What you need:

-Round Mirror ( I got mine at Hobby Lobby; it was one of the candle trays for $10 and I used my 40% off coupon)
-10 dowels. I bought mine at Home Depot for $.78 each
-Rope
-Liquid Nails
-Hot glue gun
-Cardboard
-Duct tape
-Wire

These are the dowels I used; 2nd smallest ones at 
Home depot with dark green ends


This is what Liquid Nails looks like if you were wondering

This is what I used for my rope. Its a doggy toy from the Dollar Tree, 
I just unwrapped it. 

Start by cutting 5 of the dowels in half and the other 5 in thirds. I did not measure but just eyed it as I was cutting, I wanted the variety of sizes that imperfect cuts would give me. If you do not have a saw Home Depot will cut them for you :)
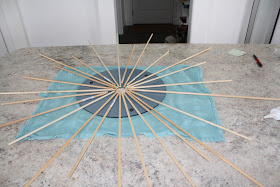
Lay your mirror face down on a towel. I quickly arranged all the dowels around the mirror before gluing. That way I did not have to worry about getting to my last dowel and having a huge gap still not covered. 


Now its time to glue :) I was worried about the longevity of only using hot glue, that's why I used the Liquid nails as well. The hot glue gave me the instant bond I needed, and the Liquid Nails will give it more long term strength. I first did little dashes of the liquid nails then did dashes of hot glue in between.  Glue all the dowels around the mirror. 

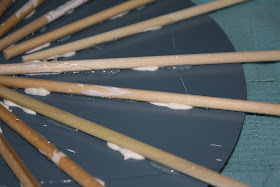
 Here is a close up of the glue..the white is the liquid nails, with dashes of hot glue in between.


Cut a piece of cardboard slightly smaller that your mirror. Use hot glue (A LOT!) to secure it on the back.

Now you are ready to paint :) Turn your mirror over and cover it with some newspaper to protect it from getting sprayed. I used Rust-oleum Metallic in Gold. 

Let it dry for several hours. Once dry, take off newspaper. It should now look like this:
                                                  
 Now we added a wire hook on the back for hanging. To do this,turn the mirror upside down on towel again, so cardboard side is up. Cut two small squares out of extra cardboard. Wrap in duct tape for extra strength.
 Poke two holes in each square. We just used a push pin.

 Push wire through one hole, bend it around and back through the other hole.

 Then twist wire together. Repeat with other square and opposite end of the wire.

Place glue on both ends, then mount onto back of mirror. 


We added more duct tape..just to be safe :)

Now you just need to add the rope on the front! If you have not already painted the rope, do so now. Once it is dry, glue it around the border of the mirror with hot glue. 


And your done!! Let it dry for several hours to make sure everything is secure before hanging! :)


 Now my boring little bathroom looks at least a little better! The mirror gives it a little interest to hold me over until I get around to  painting it! :)


Tuesday, January 22, 2013

Our First Sale!!!

Chad was super excited this week to ship off our first package :) We are now selling our Cottage Chic Bar Stools online! You can check them out at any of the following sites: Etsy, Ebay, or Amazon.


We are selling them in multiple colors!


It was a crazy week for us as this was our first online order.....we learned a lot this week :) hahaha! It was kind of hectic but in a fun, exciting way!

 The Chaos.....getting everything ready and packed up!


A very excited Hubby :)


Tuesday, January 15, 2013

Gold Polka Dot Bathroom

I am so excited to share Lucy's bathroom with you today! This is now my favorite wall in our house :) I LOVE how it turned out! I debated for awhile what I wanted to do with Lucy's bathroom; stripes, wainscoting, stencil, etc. And then what color?! Sometimes I spend so much time trying to decided what I want to do and debating it over and over in my head that it never gets done :) So I just decided one day I was going to do it, and for whatever reason polka dots where on my mind that day. And as I was debating between about 5 colors Chad showed up and told me to paint it gold. So gold polka dots it was!

Here is a picture of her bathroom before; all plain and boring.


I made a stencil and started going at it, I would just mark the end of the stencil with chalk and then start there with my next circle. I used Martha Stewart's paint in Pearl Gold. 


While I was painting I also decided to switch out her boring towel rack with a fun mantle. I had the mantle already; one that my father had built when I was young. I just painted it blue and added some cute knobs on it from Hobby Lobby! Here is what her bathroom looks like now!


Friday, January 11, 2013

My Dream Kitchen Part 1: Painting our Island

When we were going through the process of looking to buy a house, then deciding to build, I was so excited to get the kitchen of my dreams. At night I would literally dream about it…white cabinets, beautiful new counter tops, an island to sit cute little kids at…it was all planned perfectly in my mind J

Then we went to the Design Center for our builder and reality hit. Wait…you want how much for white cabinets?!?  I was so frustrated that my simple little dream wasn't actually simple, and the DIYer in me and my husband refused to pay so much for something we knew we could do for so cheap (plus I was just really mad at the moment and felt like I couldn't give them the satisfaction of giving in..haha!). We ended up going with the Base Level (free) cabinets with the intention of painting them white ourselves.

Alright, that was a long introduction to today’s topic, my kitchen Island Re-do, but I seem to be flabbergasting everyone when I tell them I’m paint my brand-new cabinets. It was my intentions to do so before we even moved in J.  I did decided to play it safe and do the island first, and it might be just enough white to hold me over…for now ;)
Here are the before pictures of our island and kitchen:
 
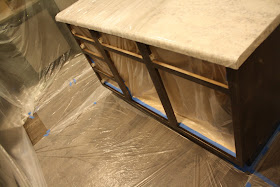
I hated how it felt so dark and couldn’t wait to get started! After sanding down the island we tarped off the rest of the kitchen to keep everything safe from overspray.  


We took all the cupboard doors and drawers off and painted them out in the garage. We taped off the inside of the cabinets to protect them from overspray as well.

After everything was safe we went to town spraying the island white! J Here is a quick summary of the steps we take when painting:
  1.        Sand with electric hand sander
  2.        Prime
  3.        Sand; from here on out whenever we sand we use a fine grit foam pad sander. Doing this will ensure that your finished product is a lot smoother and glossier to the touch!
  4.        Paint color—in this case white
  5.        Sand
  6.        Paint
  7.        Sand
  8.        Clear protective coat, we use polyurethane.
  9.        Sand
  10. .    Clear coat.

I know it seems like a lot of steps and a lot of sanding, but it actually goes really fast. And when doing the sanding step in between coats of paint(after the paint has dried), you just go over it really fast and lightly, it only takes a minute!
We also decided to add legs where the countertop hangs over a bit. We used railing (staircase) spindles. For some more detail we added base trim around the bottom of the island and the final touch was adding some wainscoting all around for some fun detail…and I may have a slight obsession with wainscotingJ.


I absolutely LOVE how it turned out! I couldn't be happier.  And I feel as if it added enough white and “ME” to our kitchen that for now I am fine leaving the rest of the cupboards as they are!