Showing posts with label Kitchen. Show all posts

Thursday, May 15, 2014

Just saying Hi!

Hey everyone! Sorry for the lack of posting! If you follow me on Facebook or Instagram you saw that we had our baby girl! ..And I totally forgot how much work newborns are!! hahaha! So that's what I've been doing.....  ;)

Just thought I would pop in real quick and let you know I am still alive! Plus, I wanted to share with you my Mothers Day present that my hubby built! I just snapped these pics real quick, did not edit, and also realized that I did not pick up the house first so there is all sorts of clutter in the background! ..I am all about keeping it simple and real right now! ;)


Isn't beautiful!?!?!


I love how he rounded the corners..I feel like it gave the table such an amazing finish!


And of course I had to repaint and reupholster my chairs to go with our new table ;) 


The legs are from Lowes, they are actually cedar fence post!! Just turned upside down!


I love it so much! Maybe I can convince the Hubby to write up a tutorial for you! ;)

And just because every good post should end with a cute baby picture...here is our sweet Olive! She will be 3 months old in just a week and I cant believe how much she has already changed! She is so much fun! 


Tuesday, May 28, 2013

Easy Summer Centerpiece: DIY Table Runner and Painted Bottles

I am addicted to change. It's true. You will see that more and more as you are following me, I am constantly changing things :) This means I have to find easy and affordable ways to decorate and redecorate my house. One of the fun ways to change things up is your table settings/centerpiece. This is a super easy DIY; cheap, and fast!

We splurged the other day and bought the "good" Rootbeer ;) And as soon as I saw those glass bottles my head started spinning with ideas.


 You will first want to clean them and take off the label. The easiest way is to just soak it in a tub of warm soapy water. I just let them sit in our sink for a few hours.

Once they have soaked for awhile the labels will peel right off.

After you have removed all the labels, let the bottles dry. Now you are ready to paint! I used a foam brush and just normal wall paint. I had a bunch of the small sample sized paints in many colors to use. 

I did 2 coats of paint on each bottle, letting it dry for at least 10 minutes in between. I did not paint the very top until the final coat of paint. That way I could hold onto the bottles without any problems.


..after 1 coat of paint..

..2 coats of paint.

Now for the Table Runner. I just used a piece of linen paint drop cloth. Cut it to size and hem the edges. To paint the polka dots I used a ping-pong ball and just normal acrylic paint.
Pour paint into a shallow cup or on to a plate to make for easy dipping for your ball. Dip one side of the ball into the paint, then stamp it onto fabric. I did a slight roll while holding the ball on my fabric to make my dot bigger.


Continue stamping until the cloth is covered in polka dots, I did a random pattern.
...you might want to be better at ironing your runner first...ignore my wrinkles... ;)


Let it dry for a few hours before use.


Wednesday, March 27, 2013

Chalkboard Paint Week! : Easy Menu Board


I know...long title for a post..sorry about that! :) I thought it would be fun to do multiple post this week all dedicated to chalkboard paint and the fun things you can do with it! Its super easy, affordable, and the possibilities are endless! I'll give you a few ideas :) 

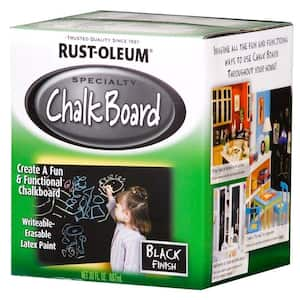
First things firsts: Chalkboard paint. I just use the ol' regular black paint. I LOVE the look! I guess I like my chalkboard projects to look like a chalkboard :) There are tons of recipes where you can make your own chalkboard paint and tint it whatever color you want. I have not tried these yet but go ahead! :) This is the paint I use :
Rust-Oleum Specialty 30-oz. Specialty Flat Chalkboard Paint 
You can find it at Home Depot for just over $9..and it last FOREVER!! I have used my ONE can for all the projects I will be showing you this week, and I still have tons left! So I would recommend getting this verse the spray cans, they don't last nearly as long and are about the same price. 

Check out my first project, a chalkboard table for kids!

Project 2: Easy Menu Board:

This project was SUPER easy!! And I love having a menu board to help me stay organized with meals. For this project I found a large picture frame at the DI (thrift store) and simply painted it!!


Beautiful before picture right? :)
I got this for just a few dollars!

I took the picture out of the frame, and then painted the frame itself. Next I simply painted the back of the picture with Chalkboard paint! Sand it down quickly first, just to make sure it is all smooth. Then paint! I paint with a foam brush and usually do 2 coats, letting it dry in between. Once again....after you have painted the chalkboard, you need to let is sit for a few days without touching it! Then you will want to "condition" the chalkboard. Simply rub chalk all over the chalkboard then wipe clean with a dry rag. You are done with another easy chalkboard project! :) 


Now I just need to work on my chalkboard penmanship..   :) 


Monday, March 4, 2013

Kitchen Back Splash Part 2: Grout and Seal

Alright, now that your tile back splash is all set and has been sitting for 24 hours you are ready to finish! Its easy from here :)  If you did not see my first post on how to lay the tile you can read it HERE.

The next step is grout. We bought a premixed grout from Home depot in grey. It was about $10 and HERE is the link so you know what brand we used :)

Grouting is pretty basic...and to tell you the truth I found it easiest to just use my hands!..Wear gloves! :) In these pictures I used a trowel that was padded (so it doesn't scratch) to spread the grout, but the grout would just plop off and and I would pick it up with my hands anyways..so soon I gave up and only used my hands ;)
I had never done this before but it was a simple fill-in-the-gaps procedure that I didn't find hard. Work in small sections because the grout does dry fast. Spread the grout all around, filling in all the cracks. Then take a wet sponge and wipe it off! The first time you wipe it off it doesn't need to be perfect..you will still see a little bit of the sand and grout on the tile. You do not want to scrub it clean yet..it will need to dry a little more first!
Once you have wiped it off, move on to the next little section (I preferred  doing about a foot at a time). Spread the grout, fill in all the cracks, then wipe it off quickly with a wet sponge. Do this over all your tile :)


 This is about as clean as you want it when you first wipe it down, you can still see a little 
bit of the grout smeared across my tile, but its mostly clean. 

Once you have finished all your tile, wait about 30 minutes to an hour for all the grout to dry. Then go back over it with your wet sponge and scrub your tile clean! Now the tile is basically done! You will still want to seal your grout to help it stay clean but you will want to wait about another day before you do this..just to make sure your grout is 100% dry before doing it! 
Sealing is super easy..the best and fastest way is to buy a sealer that you can spray over all the tile like this one we bought form Home Depot. Spray it all over your clean and dry tile, rub it around with a sponge. Let it sit for about 5 minutes, then wipe it off! For best results do two coats :)

You are done!!!!!!!!!!!!!!!!! Enjoy your beautiful new back-splash! :)


Wednesday, February 20, 2013

Kitchen Back Splash Part 1: Laying the Tile

Putting up our own back splash was a lot of fun and we were surprised to find that it wasn't that difficult..even if somewhat time consuming :) I feel the best way to teach you how to do it is to just show you a billion pictures! I'll do my best to explain as we go! Let me know if you have any questions!

Supplies:
Back splash Tile
Wall Tile Adhesive (pictured below)
Trowel..the v-notched ones are the best for wall tile. HERE
Tile Saw
Level
Pencil, for marking
Tile Spacers

Chad designed a simple spreadsheet to help determine how much tile you need (square feet) and what the cost will be! You can see it HERE.

You'll want to first clean your walls, take the covers off any plug-ins or light switches you have, and also unscrew your light switches and plug-ins from the wall; as shown below:


Determine where you want to start. This was our biggest mistake; we didn't really think about it and ended up starting on the hardest wall! If you have a wall without switches or with an adjacent wall that you will put your tile flush up against, start there. We did not do this and needed to cut our first square!
To cut it, I held it up on the wall where we wanted it to go while Chad traced the outline of the socket, where we needed to cut.

 Then we pulled off all the tiles that needed to be cut from the mesh backing and cut them each individually.


Once we pulled them all off Chad would go cut!

 Spread the tile adhesive on the wall. Spread it on thick at first, then use the triangular notched side of the trowel to even it out.. :) This is how you will get the lines running through the mud.


 Place tile on wall, making sure its even (use level). For tiles that you took off and cut you may want to use tile spacers to make sure it stays even. Push firmly to make sure its all in place and wont slide.


When you place the tile around the sockets..make sure you go BEHIND  it. This is why you unscrewed them in the first place, if you don't go behind them, it will look like your sockets are sinking into the wall--you want it to be even and flush with your wall tile.


We decided to go across the wall under our windows to join up with the other side. To do this, we took ALL the tiles apart and stuck them up on the wall individually, cutting a lot of them to form the top and bottom halves you see below:


 Continue spreading the adhesive and placing tiles as you go, cutting when needed.

Our little helper :) Our neighbors bought this HUGE tub of adhesive..it has now been used in 3 houses and we haven't even used half of it!


I would go back and softly tap all the tiles as I went, to make sure they were all secure and set well.


..and keep going! Marking and cutting tiles as needed!


Chad started numbering all the tiles we were cutting to make it easier to remember where they went.


In this picture you can see me putting up the tile square where we have a plug in. We have already removed the tiles that needed to be cut, now just put the rest up, and cut away the back meshing. After Chad cuts the tile pieces, I will put them up individually where they belong.


And that's it! The end of Part one! Once all of your tile is laid you need to let is sit for 24 hours. In Part 2 we will show you how to grout and seal! The hardest part is now done! :)